


News
Artists Series: Kyros - Creator's Story
Kyros invites his audience to have a glimpse of his playful view on life by breaking stereotypes of form and structure. Get inside Kyros’ mind, read...
Our "How To" series are meant to share the knowledge on creating immersive content and break down the magic behind Augmented Reality. Here are some guidelines for you to create an AR mural yourself!
Let's begin with the target. A large mural will be used as an image target with the SQUARS platform to create an interactive AR experience at the mural’s location.
The first step is to establish the vision for the combined mural and AR experience. Ideally, the physical artwork and the digital content will be linked, sharing a common theme and aesthetics, so that the overall experience is cohesive.
Consider whether elements of the mural will feature in the digital content, and plan how they will appear in both mediums.
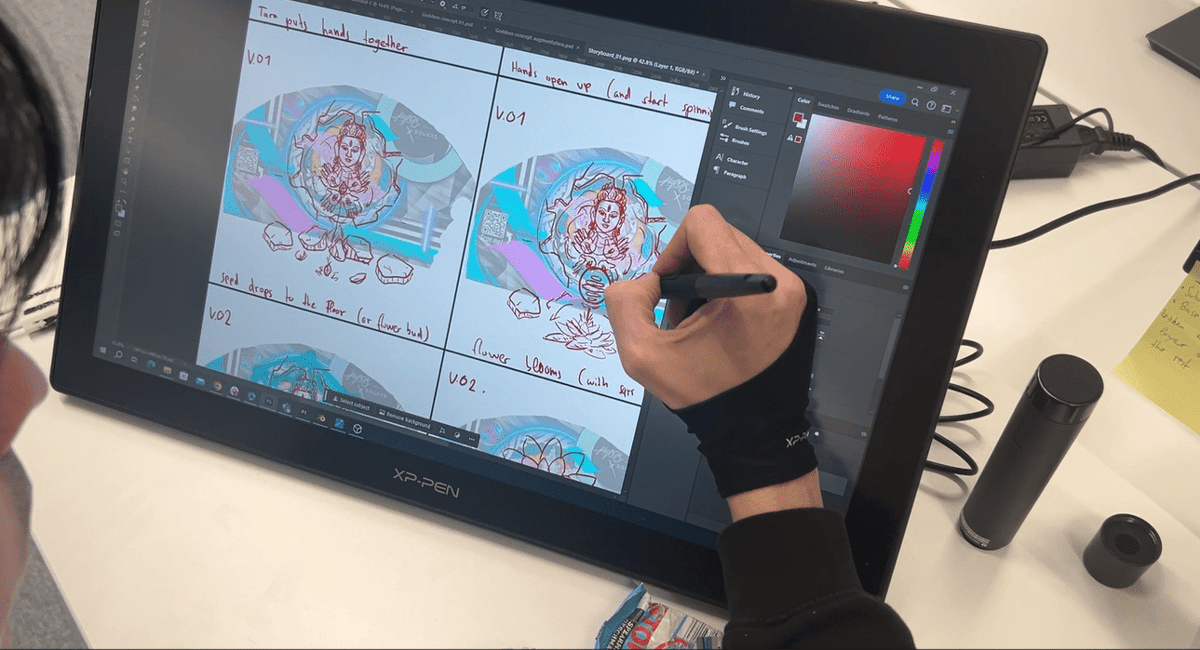
Develop the mural concept on paper and prototype with the SQUARS platform. The image target can be updated at any time with a new version of the mural design. Although the final mural may be very large, it can be prototyped on a standard piece of paper.
Test the quality of the image target tracking as the design develops. Aim for high-quality tracking for the best user experience.
Once the design is painted at the location, a final image target file can be created by taking a photograph of the completed artwork. The photograph will capture any additional details and textures, such as brickwork, pipes, and so on, to aid tracking on site.
Any unwanted parts of the mural location, such as windows, can be masked by filling them white on the tracking image.
Placeholder content can be used for the augmentation, and updated as it develops.
Think about the use of 3D, animation, sound, and video.
Animations, sound, and video can be triggered by tap events within a scene.
You can use default assets provided by SQUARS or import files from your computer.
Multiple scenes can be used to present completely different content, much like chapters in a story. The user can transition from one scene to the next using tap events.
Consider depth, utilizing the space in front of and behind the plane of the mural.
Once you're ready to share your AR creation with the world, simply tap "Publish" and share your AR story with your audience.
Remember that the experience can be viewed from different angles. If there is an ideal viewpoint, consider marking it on the ground to guide viewers where to stand.
Consider where to place the QR code. Will it be part of the artwork? Is it large enough and clear enough to activate from a distance?
We're suggesting publishing a “coming soon” scene early so that viewers will have something to see when they activate the experience, and will know more is on the way.
Are you ready to start creating your own AR experience? You can do it in 5 simple steps:
Follow us on our social media channels to stay tuned for our update!
Kyros invites his audience to have a glimpse of his playful view on life by breaking stereotypes of form and structure. Get inside Kyros’ mind, read...
AWE EU 2022 - SQUARS launches WebAR platform to create own augmented reality experiences. Find out more about the event and the SQUARS platform.
Get inspired by these 4 creative AR ideas for education and training and become the most popular teacher in your school in no time!